
如今,数据隐私和安全变得至关重要。 因此,我们需要隔离数据库凭证并使其对我们的应用程序/服务透明。
概述
在我的旧帖子中,我写了关于使用 Jasypt 加密数据库凭证的内容。但是我们仍然在属性文件中保留加密值。这意味着,在某些时候,开发人员可以解密该值并读取这些凭据。
但..
从应用程序的角度让它真正透明怎么样?我所说的透明的意思是;该应用程序对凭据一无所知。因此,在这篇博文中,我想从应用程序的角度分享如何保护您的数据库凭据。
我将使用 Hashicorp Vault 作为秘密管理工具。所有数据库凭据都将存储在 Vault 中,我将在引导应用程序时检索这些凭据。
用例
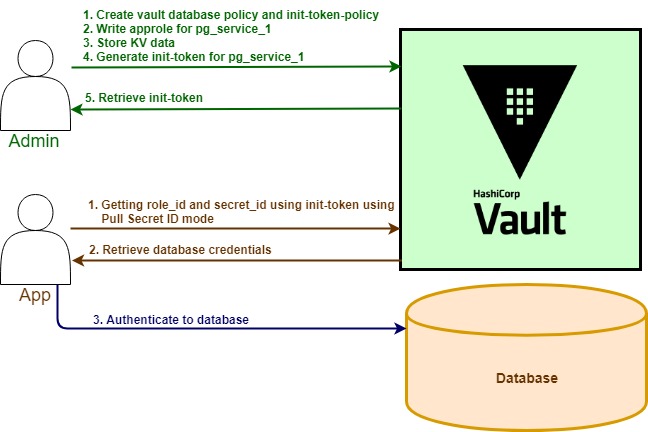
在此用例中,我将创建一个服务并将其命名为 pg_service_1。服务本身将连接到 postgres 数据库,就像任何普通服务一样。但是,不同的是,我不会在属性文件中放置任何数据库凭据配置。相反,它们将保存在 Vault 中。
pg_service_1 会将具有一定有效期的初始令牌传递给 Vault。接下来,通过使用 AppRole 身份验证模式,该服务将在应用程序启动期间使用提取秘密 ID 模式检索数据库凭据。然后虚拟服务将连接到数据库并继续准备好为请求提供服务。
For this purpose, I will have two personas, which are admin and app (pg_service_1).
Admin
第 1 步:启用 AppRole 身份验证并创建 Vault 策略、
# enable approle
vault auth enable approle

# create secret path
vault secrets enable -path=database kv-v2

# database-policy.hcl
# Read-only permission on 'database/*' path
tee database-policy.hcl <<"EOF"
path "database/*" {
  capabilities = [ "read" ]
}
EOF

vault policy write database database-policy.hcl

# database-init-token.hcl
# policy for initial token
tee database-init-token.hcl <<"EOF"
path "auth/approle/*" {
  capabilities = [ "create", "read", "update" ]
}
EOF

vault policy write database-init-token database-init-token.hcl
Step 2: Write AppRole for pg_service_1
# write approle for pg_service_1 with policy:database and ttl:1h
vault write auth/approle/role/pg_service_1 policies="database" token_ttl=1h
Step 3: Store KV Data
# Store kv data

tee postgres.txt <<"EOF"

{

  "url": "jdbc:postgresql://10.10.10.10:5432/db",

  "username": "user",

  "password": "password"

}

EOF
vault kv put database/postgres/service_1 @postgres.txt
Step 4: Generate Init Token and Pass It to App
# Generate init token for APP, valid for 3 days
vault token create -policy=database-init-token -ttl=72h

# Result: s.rMdwZh8udP9HVYmu1SmrSO3F
App
For App, I will use Spring Boot as our pg_service_1.
Step 1: Add vault dependencies in pom.xml
<!-- snippet code -->
<dependency>
    <groupId>org.springframework</groupId>
    <artifactId>spring-web</artifactId>
</dependency>
<dependency>
    <groupId>org.springframework.vault</groupId>
    <artifactId>spring-vault-core</artifactId>
</dependency>
Step 2: application.yml
spring:
  datasource:
    type: com.zaxxer.hikari.HikariDataSource
    driver-class-name: org.postgresql.Driver
    hikari:
      poolName: Hikari
      maximum-pool-size: 5
      auto-commit: false
      connection-test-query: SELECT 1
  jpa:
    database: POSTGRESQL
    hibernate:
      ddl-auto: update
    properties:
      hibernate.jdbc.lob.non_contextual_creation: true
      hibernate.connection.provider_disables_autocommit: true

vault:
  appconfig:
    token: ${TOKEN:default}
Please note I exclude url, username and password under spring.datasouce key.
Step 3: Configure Spring Vault
@Configuration
@ConfigurationProperties(prefix = "vault.appconfig")
public class AppConfig extends AbstractVaultConfiguration {

    private String token;

    public String getToken() {
        return this.token;
    }

    public void setToken(final String token) {
        this.token = token;
    }

    @Override
    public ClientAuthentication clientAuthentication() {
        final VaultToken initialToken = VaultToken.of(token);
        final AppRoleAuthenticationOptions options = AppRoleAuthenticationOptions
                .builder()
                .appRole("pg_service_1")
                .roleId(RoleId.pull(initialToken))
                .secretId(SecretId.pull(initialToken))
                .build();

        return new AppRoleAuthentication(options, this.restOperations());
    }

    @Override
    public VaultEndpoint vaultEndpoint() {
        final VaultEndpoint vaultEndpoint = VaultEndpoint.create("localhost", 8200);
        vaultEndpoint.setScheme("http");
        return vaultEndpoint;
    }

}
AppRole authentication with PULL mechanism.
Step 4: Reconfigure Datasource Configuration
@Primary
@Configuration
@ConfigurationProperties(prefix = "spring.datasource")
public class DataSourceConfig extends DataSourceProperties {

    @Autowired
    private AppConfig appConfig;

    @Override
    public void afterPropertiesSet() throws Exception {
        final VaultToken login = this.appConfig.clientAuthentication().login();

        final VaultTemplate vaultTemplate = new VaultTemplate(this.appConfig.vaultEndpoint(),
                new TokenAuthentication(login.getToken()));
        final VaultKeyValueOperations operations = vaultTemplate.opsForKeyValue("database",
                KeyValueBackend.versioned());
        final Map<String, Object> data = operations.get("postgres/service_1").getData();

        this.setUsername((String) data.get("username"));
        this.setUrl((String) data.get("url"));
        this.setPassword((String) data.get("password"));
        super.afterPropertiesSet();
    }

}
Note: set as @Primary bean, extends DataSourceProperties class and override afterPropertiesSet method.
Step 5: Start Application Using Init Token from Admin-Step 4
# pass init-token using -DTOKEN
# init-token: s.rMdwZh8udP9HVYmu1SmrSO3F
mvn spring-boot:run -DTOKEN=s.rMdwZh8udP9HVYmu1SmrSO3F
The service should be up and running; with connection to postgres database.
结论
通过使用这种数据库凭证隔离,我们可以确保只有某些人有权访问凭证。 这种方法将使您的 IT 生态系统更加安全、可审核和可控相关用户对生产数据库的访问